Designer/Creator: Unknown/Traditional
For any questions, comments or suggestions, email accessorigami@gmail.com
Description and more information:
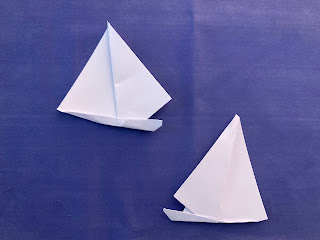
Reiner shares with us the first model he ever folded, a sailboat with only 4 folds, but, as he explains: "Even a simple model like this one, with only four folds, can often be difficult to describe without the use of visual or tactile input".
Yet, the instructions below highlight some of the techniques we can use to make the folding process accessible to all.
This model is flat or 2D and is very recognizable as an elegant sailboat with 2 large, open sails, but only from the front. It is therefore a very nice model to use on cards or as part of dioramas.
1. Place a square paper in diamond orientation on the table.
2. Valley fold the right point over to meet the left point
You will have a right-angled triangle pointing to the left, with the fold vertically on the right side.
3. Fold the top layer of the triangle back to the right, using a valley fold line as follows:
Take the lower diagonal edge of the right-angled triangle and divide it into 3 parts.
Go one third from the lower corner along this edge in the direction of the left point.
This is the starting point of the folding line.
The other end of the folding line is the top corner of the triangle.
Make a strong crease along the line indicated above and leave folded.
The result will be 2 long triangles that have formed side by side, which will be the 2 sails, and a small triangle facing you on the right bottom corner of the model.
4. Make another Valley fold upwards along a line which is fixed by the following points:
Go from the left tip of the model, down a little bit (in the case of a 15 by 15 cm paper, this will be about 1,5 cm).
This is the starting point of the folding line.
Focusing on the small lower triangle nearest you, move from its top right corner a little bit downwards along the right edge (in the case of a 15 by 15 cm paper, about 1 cm).
This is the end point of the fold.
Make a strong upwards valley crease along the line indicated above and leave folded.
When you have finished this valley fold, the result will be that a long, narrow triangle, the body of the boat, will have formed at the bottom of the 2 sails.
The right tip of this triangle reaches out of the model a little bit.
Take care that the upper horizontal edge of this narrow triangle forms a right angle with the line between the 2 sails.
This will ensure that your sailboat is in the right orientation for the last fold.
5. Notice that the bottom of the boat is not quite straight yet, but consists of a triangle that slants downwards to the bottom right.
Using a mountain crease, make a small horizontal fold at the lowest part of the bottom right edge of the model.
The folded point of the triangle should disappear behind and underneath the model.
The result should be a trapeze shape with the top and bottom edge of the boat in a similar horizontal orientation.
The bottom of the boat will thus end up fairly flat, gently sloping up at the sides.
Finnished! The model looks like a sailboat, but only from the front side.
Shared via the Access Origami Email Group


Comments
Post a Comment